Steps in the manufacturing of hollow-fiber dialyzers
This overview relates to Cuprophan® fibers. To day, a few new kinds of fibers (such as polysulphone and others) are used, with which I have no practical experience. With such fibers, certain deviations from procedures here described may be needed.
This overview is a simple and general description of procedures well known in the dialysis industry and doesn’t contain any specific copyrighted information. This is a generalized and simplified description of how most manufacturers used to handle Cuprophan® fibers.
Fiber bundling
If the fiber comes on rolls, it will have to be bundled. Fibers from an array of rolls are wound on a vertical polygonal wheel. It is advantageous to wind on the wheel in parallel strings from a number of rolls. That way certain minor differences between various manufacturing batches of the fiber average out. If the fiber is filled with a liquid – Cuprophan® fibers were filled with isopropyl myristate, an oily liquid – this liquid is likely to drip from the fibers and a set of trays under the fiber pathway and the wheel will be needed for catching this liquid. It will, of course, drip still more when the fiber bundles are cut out.
The reason why these fibers are filled is that the fiber extrusion using the cuprammonium (cuoxam) process requires that the internal space of the fiber is kept expanded by a “liquid mandrin” to prevent the extruded fiber from collapsing while yet humid and soft. Isopropyl myristate can be considered to be non-toxic and is widely used in cosmetics. It is found naturally in certain products like coconut fat.
When the desired number of fibers has been wound up, the bundles are cut out from each section of the polygonal wheel (preferably at the lowest section to easier catch any dripping liquid, turning the wheel a bit for each new bundle). For this purpose the bundle is first wrapped with a thin plastic or cellophane foil and then cut out, using, e.g., an electric bread knife. If a flammable filling liquid should be used (which isopropyl myristate is not), an electric knife and other electric equipment would have to be explosion proof. If the liquid should have potentially toxic vapors (which isopropyl myristate has not), corresponding protection for the personnel would be needed. The cut-out bundles in their foils are stored in a box.
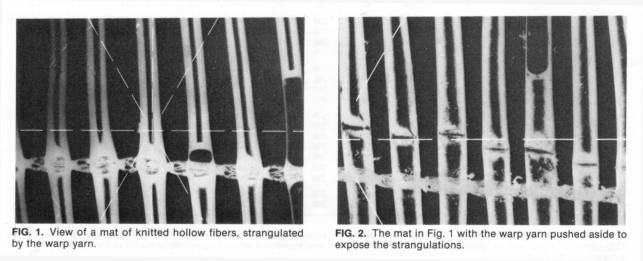
A neat method has been used by some manufacturers for bundling: knitting the fibers with warp yarns in a knitting machine so as to form a fiber mat, which is then rolled and cut. It is, however, difficult to avoid that the warp yarn strangulates the fiber a bit (se illustration). (According to my information it seems that this way of bundling may first have been proposed and used by Mr. Claudio Sama, Italy, but it was then adopted by a few other manufacturers.)
Fiber washing
The fibers will need to be washed, in any case if they are
soaked with a filling liquid (one reason is that rests of that liquid could
interfere with the potting, see below, another may be toxicity, which is low
for isopropyl myristate). If the fiber is hygroscopic (as Cuprophan®
is), it would swell if it
were to be washed with water or a watery solution and then to shrink again when dried,
with a damaging result on the fiber properties. An ideal washing liquid is
Freon (dichlorodifluoromethane),
but its use is for well-known ecological reasons no more permitted to day. It
has the advantage of not being flammable and being easily recycled through
distillation, since it has a low boiling temperature and a low energy
consumption for evaporation. Its biological toxicity is low but its ecological
toxicity is high... A traditional alternative is to use isopropyl
alcohol. A possible alternative could be petroleum ether (a not yet tested nor
published idea by the author), but there will be other liquids which are
suitable for the purpose. The washing may be carried out by means of multiple
immersions of boxes with bundles (the boxes have to have an open mesh-like
bottom), but there are also other procedures (such as clamping dialyzers in a
rotating machine that carries out a set of stages of washing and drying while
revolving 360°). After that, the bundles have to
drip off and dry. If the liquid is flammable, it is obvious that the equipment
and the whole set-up must be strictly explosion proof. The personnel must also
be protected from breathing potentially harmful vapors.
The use of alcohol can lead to a very small and usually quite negligible shrinkage of the fiber, since the alcohol absorbs a small residual humidity from the fiber and actually dries it still more. This doesn’t happen with Freon and probably not with petroleum ether.
Dialyzer sleeves
The bundles are then inserted in plastic sleeves, which will form the outer body of the dialyzer. The bundle, still wrapped in the foil, is gently pushed into the sleeve and the foil is pulled out. All plastic parts have to be injection molded in a very clean procedure in order not to have any potentially toxic residues on the plastic surface or in the material. No flow-aid must be used (an agent added to the molten plastic to make it flow more easily in tubings and in bores in the molding tools). No separation aid must be used (a waxy agent sprayed on tool parts to make the plastic separate more easily from them after molding).
Potting
The bundle ends are then simultaneously potted at the ends of the sleeve, usually with polyurethane. This way, the fiber bundle ends are sealed between each other on their outside and the dialysate space becomes separated from the space in the blood distributing caps to be later assembled on the dialyzer. The potting is at a great advantage done in a centrifuge (the dialyzer lies horizontally and spins around its vertical axis). A divided vessel is in the center on the outside of the sleeve and from it tubes lead inside the sleeve through the dialysate connectors. Special disposable (or maybe reusable) potting caps cover the ends of the sleeve with the fiber bundle and collect the polyurethane, being centrifuged out towards them. Liquid polyurethane is poured in the central divided collecting vessel and escapes due to the centrifugal force through the tubings into the sleeve when the rotation starts. The rotation must continue until the polyurethane is cured.
This arrangement has two advantages. First, both ends are potted in one procedure. Second and because of that, leaky fibers are automatically sealed (plugged) inside and excluded from the blood flow. One or two fibers in the bundle may have a “pin hole” in the fiber wall. In that case, air escapes through the hole during the centrifugation and liquid polyurethane enters inside the fiber far enough, so that this fiber will not be opened when the potting is cut (since the fiber is then filled with polyurethane where it is cut and the fiber lumen remains closed). Fibers which are not leaky will, however, not be filled that far, because compressed air trapped inside the fiber will prevent the polyurethane from entering more.
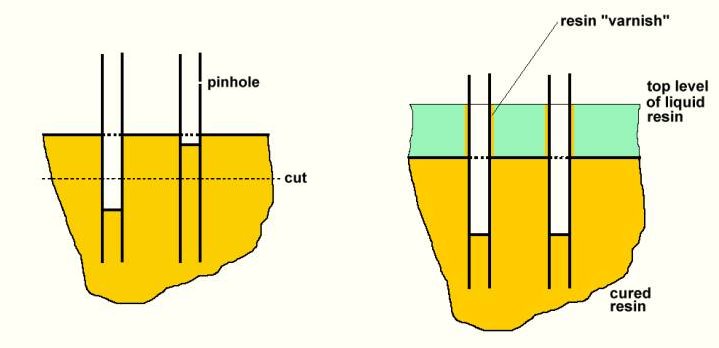
Care is needed in the design of the potting arrangement. If the polyurethane resin flows into the sleeve too fast, it will first swap up inside the sleeve towards its center and then flow outwards into the potting caps. That means that the axial surface of the still liquid polyurethane in the rotating dialyzer will be a bit be closer to the center for a moment, before the resin flows out peripherally through the fiber bundle to fill the potting cap. This is because of the flow resistance to the rather viscous liquid resin in the inter-fiber space. As a result, a certain portion of the fibers will be “varnished” by a very thin polyurethane layer close to the inner surface of the polyurethane potting. This “varnished” portion is no more semipermeable and is inactivated. This effect should, therefore, be reduced to a minimum by not letting the liquid resin flow into the dialyzer too fast. Experimenting with different sizes of the tubing, through which the liquid resin enters the dialyzer – so as to find an appropriate flow resistance in the tubing – is advisable.
One may use a stroboscope to visualize how the resin behaves inside the dialyzer until it cures, such as how fare it “rises” inside towards the center before settling in the potting caps.
Alternatively, an arrangement is possible in which the liquid polyurethane enters the dialyzer end through tubings which lead into the potting caps instead of being inserted into the dialysate connectors.
It is extremely important to keep a tight control of the mixing ratio of the two polyurethane components, isocyanate and polyol. It must be as specified by its manufacturer for complete curing without leaving a residue of any one of the two components. If such an unreacted residue remains, this can be very harmful, being both toxic and blood injuring (causing hemolysis or clotting). There have been rare incidents of patients dying for that reason! As is obvious, no toxic additive like, e.g., a catalyst, must be used. If there is a rest of isopropyl myristate (if it is used) adhering to the fibers, it can locally cause a slightly milky appearance of the resin when it cures. Very small residues are, however, absorbed by the polyurethane, acting as a slight plasticizer but causing no harm.
In case the fibers could have absorbed some humidity from the air in the meantime, it may be suitable to dry them once more with clean air before potting.
If the hollow-fiber device has such a design that simultaneous potting of both ends of the fiber bundle is difficult or not possible, or if the fibers (then rather for another use than dialysis) are to a certain degree permeable to air (so that the resin is not held back by an internal air pressure but penetrates inside the fiber), a two-stage potting procedure might be used. In a first stage, enough resin is introduced so that it merely covers the fiber ends. In a second stage more resin is added to embed the fibers.
Cutting
When the potting is cured, the polyurethane is cut through close to the ends of the sleeve. This opens the fiber ends – except in the case of a fiber with a “pinhole” (see above), in which the resin has penetrated further and sealed the fiber off. Cutting can be done with a book-cutting machine or a similar arrangement, in which a block clamping a number of dialyzers with exposed ends is inserted.
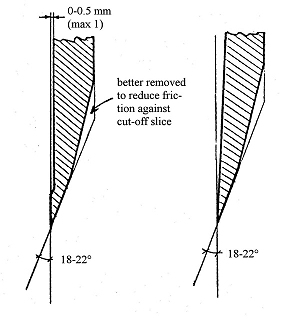
It is suitable to do the cutting in two steps: first a raw cut and then a fine cut (or two) in order to get a smoother surface. A sliding cut, as done by book-cutting machines, is recommended. Suitable shapes and dimensions for the knife (according to general recommendations by various manufacturers of cutting machines) are shown here:
Finalizing the product
Now the blood-port caps are assembled to the ends of the dialyzer, either by screwing (with a rubber ring inside for sealing) or by ultrasonic welding. A strong snap-on arrangement with sealing rings may be an alternative.
The assembled dialyzer should be leak tested to assure that there is no open or broken fiber in the bundle (that has escaped the above-mentioned sealing-off effect) or a major pinhole in one or more fibers, and also for a check of the sealing of the mounting of the headers.
It may be suitable to once more wash through the dialyzer and dry it, but if the assembly is done carefully under sterile and particle-free conditions, this may not be needed. However, the cut polyurethane surfaces should be blown free from any particles using a clean air jet before this assembly. The blood ports on the dialyzer headers are tapped or covered with small caps, which are so designed that they let sterilizing gas pass through (if gas sterilization is used). The dialyzer is then labeled, packed in a sterilizing bag and sterilized. After that follows, of course, the final inspection. Let us hope that it doesn’t happen too often, what was once found: A dead and neatly sterilized fly was seen under one of the headers (blood-port caps)... Luckily, that dialyzer didn’t reach the market...